This is the 2023 update of an article first published in 2017. You can also download a PDF version of this article. The original version has been hijacked by Developer and is available here.
A bug is when a program behaves in an unexpected way.
Bugs ruin games for players, and our processes are designed to keep bugs out of the final product. Removing bugs — debugging — is one part of this and an important programming skill.
Here, I share my thoughts on how to think about bugs, how to get rid of them, and how to get better at it.
The main points I want to get across are:
- Bugs do not only hurt players; they hurt the game development process itself.
- Debugging is a scientific process.
- Finding the cause of the bug requires us to move down one branch of a tree of all possible causes.
- Considering only one cause at a time is ineffective.
- Finding the cause of a bug and changing code to fix it are separate processes.
- Some bugs have common patterns, and we can use generic strategies to deal with them.
- We can improve over time by debugging post-mortems and keeping bug diaries.
What causes bugs
Causal chains
Consider this bug:
🐛 When I hit play, I expect to see my avatar, but I don’t.
We would be surprised if a game with this bug had code like the following:
// Hide the player when the level loads
OnLevelLoad += HidePlayer;
More likely, a less direct problem in the code leads to the behavior we see. We call the observed behavior a symptom. When somebody asks how a bug manifests, they are asking what the symptoms of the bug are.
To find the cause of a symptom, we must find out why it happens. And then why that happens, and so on. This list is the causal chain that leads to the bug. The causal chain for the bug above may look like this:
🐛 (Symptom) When the level loads, I expect to see my avatar, but instead I don’t. Why?
- (Direct cause) Because the code that moves the player is not called. Why?
- Because the player update method exists early, because the inventory is null. Why?
- (Root cause) Because it has not been initialized. Why?
- (Direct external cause) Because of sloppiness – I forgot.
Here is code that demonstrates this bug:
class Player
{
   private Invetory invetory;

   private void Update()
   {
      if(invetory.Full()) { ... }

      MovePlayer();
   }

   private void MovePlayer() { ... }
}
The first cause outside the software that we can change, is the direct external cause, and is where we can stop our chain. The direct external cause of any bug is always one of the following:
- Sloppiness (which is really a process bug).
- Misconceptions (which is really a knowledge bug).
- A software or hardware bug that we cannot fix.
Just above the external cause in the chain is the root cause. As I will explain later, the root cause is the best place to implement an intervention.
All the causes above the root cause in the chain are surface causes, and the first surface cause in the chain is the direct cause of the bug. When we cannot fix a bug at the root cause, we can implement a workaround or partial fix at one of the surface causes.
The tree of possible causes
When we are confronted with a bug, we do not know the causal chain of the bug. Instead, we have a tree of possibilities. A partial tree for the bug above, may look like this:
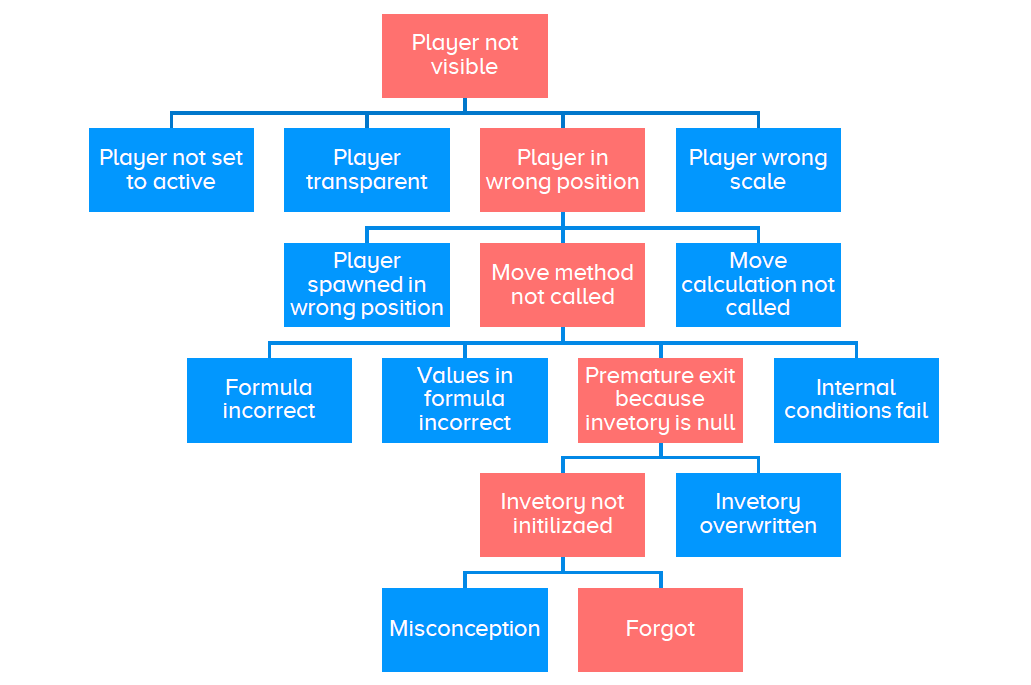
To find the cause of a bug, we must move down this tree to the root cause. At each level, we do experiments to rule out all but one of the possible causes. We then drill down this cause by listing all its possible causes and repeat the process. Eventually, we arrive at a cause that is external. The cause just above this is the root cause.
The debugging process
Computers don’t use magic.
They follow deterministic rules, and when computers fail, there is a reason, and by systematically working our way through the possibilities you can always find the reason.
Some steps need a dash of creativity, but effective debugging is a systematic process. You need to understand cause and effect, make analytical inferences from the knowledge at your disposal, organize tasks in an efficient order, track your progress, and record findings for future usage.
Keep diagnosis and fixing separate
Removing bugs revolves around two principal processes:
- Diagnosis: The process of finding the cause of a bug.
- Intervention: The process of changing the code to remove the bug. Implementing an intervention is also called fixing the bug, although many programmers use the term fix to include the diagnosis.
There are important reasons to keep these processes separate in your mind.
- If you don’t, you could spend a lot of time implementing a fix that does not solve the problem.
- Experiments to rule out causes can often be implemented much faster than interventions, so you can diagnose the bug much faster if you don’t try to fix it at the same time.
- When deciding on the best order of performing experiments, you may make mistakes if you include estimates of interventions.
Be precise when formulating a bug description
Bugs are often reported by the QA team (if your project is big enough to have one), or by players. But even so, you will often have to write up bug descriptions.
If you have a QA team on your project, you probably already have guidelines on how to effectively report bugs. If you don’t, you can follow these.
Use a standard bug report format. Vague reports of bugs introduce an unnecessary extra step into the debugging process: figuring out what the bug actually is. You and your team can avoid this by using precise language when talking about bugs.
A bug report requires the following:
- A bug description (see below).
- Steps to reproduce.
- Environment (including platform, version, etc.)
A well-crafted bug description has three components:
- What you were trying to do.
- What you expected to happen following the steps.
- What happened instead.
In a sentence:
🐛 When I did X, I expected Y, but got Z.
For example:
🐛 When I collected a new sword, I expected to find it in my inventory, but instead my inventory was unchanged.
Use this format even when informally reporting bugs, or when formulating the bug to yourself. This format
- helps you remember all the information necessary to reproduce the bug;
- allows you to spot bug patterns (explained below) and think about bugs on a “high level”; and
- reminds you that you have an expectancy, and your expectancy may be faulty instead of the code.
Some types of behavior are harder to frame in this form, for example bugs that are sporadic, are seen at unpredictable times, or involve frequencies. Here are examples of dealing with this:
🐛 When jumping, I expect to come down again, but sometimes (3/5) I keep rising and I must exit the level to continue.
🐛 When I start the second level, I expect to continue playing, but instead the game exits at a random point (seen between first and third waves of enemies).
🐛 When I run the game 10 times, I expect each of the two monsters to appear about 5 times, but instead the green monster appears 8 times.
Use standard tests. You can also gain from using formal, named test cases, which allows efficient communication of what breaks where. For example, if you have a flow chart of the player login cases, with labeled nodes, you can say:
🐛 When going through the login process through node A, I expected to reach node B but instead an error message displayed with the message “Already logged in”.
Don’t use ambiguous expressions. By themselves, simplistic descriptors, like these below, confuse and waste time. Provide enough detail to know exactly what happened.
- “Crashes.” (Premature normal exit? Or exit with error dialog?)
- “Hangs.” or “Freezes” (All animations stop? Or no further actions possible?)
- “Is slow.” (Framerate? Or latency?)
- “Does not work.” (???)
Add support material. Debugging aids like the following can help clarify a bug report and provide useful information to the programmer who has to fix it. Add it to the report if it is available.
- Images or videoclips that show the problem.
- A log of the run.
- Any error messages that appeared.
- Crash dumps.
- Profiling snapshots.
The 12-step process
To fix a bug we can follow this process:
- Review the bug description.
- Prepare your environment for easy reproduction.
- Reproduce the bug.
- List possible direct causes.
- Design experiments to rule out causes.
- Prioritize experiments.
- Do experiments until the cause is found.
- If you are not at the root cause, drill down a level deeper. (Repeat from step 1, taking the last cause you found as the new bug).
- Implement your intervention and verify.
- Implement defenses and verify.
- Work through consequences and verify.
- Clean up and verify.
At any point in this process, you or your team may decide that continuing would be too expensive, in which case you “give up” on trying to fix the bug, and leave it as a “known issue”.
Step 1: Review the bug description
Review the bug description, and make sure you have enough information to understand what the bug is and when it occurs. If there is missing information, it will save time to try to get it before you start debugging.
If you cannot get the missing information (maybe an anonymous player reported it), and are still expected to solve the bug, use experiments to fill in the gaps. For example, leaderboard-bugs are usually platform specific. If a bug report omits the platform, you will have to experiment on different platforms to see where the bug occurs.
Step 2: Prepare your environment for easy reproduction
During the debugging process you may need to reproduce the bug multiple times, so it pays to make it as easy as possible.
Start clean. Make sure the code is in a good state before you begin. This depends on your workflow, but typically means you need to create a new branch from the branch where the bug was reported from, with no local changes. This makes it easy to undo any code changes you make while debugging, or recover to a specific state if you need to check your work.
Make it easy to reach the bug. A bug in level 10 for example may require you to play through the entire game. If you make it possible to start at level 10 or to skip levels, then it is much easier to reproduce the bug.
Make it easy for the bug to occur. For example, a certain bug may only occur when fighting a certain enemy type. A useful step would be to change the game to always spawn this enemy type.
You may even fake the conditions of a bug. For example, if the player is supposed to get an achievement after killing 100 enemies, but does not, set the counter to 99 so you can trigger the conditions after one kill.
Make it easy for you to see diagnostic information related to the bug. For example, if the user signs out of the game, the input controller may stop working. Whether to process input is usually controlled by a bunch of conditions — seeing these on screen would make it easy to see which one is incorrect.
Step 3: Reproduce the bug
The first step towards removing a bug is to follow the reproduction steps and verify that you see the bug. If you reproduce:
- You know the bug is real, especially when dealing with subjective issues.
- You know that no other bugs lead up to the bug in question. Each bug is part of a causal chain. In a cascade of error situations (such as 10 errors reported in the editor console), you usually want to look at the first one, since it may be the cause of the others.
- You have a clear way to test whether the bug is fixed. If possible, simplify the reproduction steps.
If you cannot reproduce, you need solve this mystery, using this tree, and perform experiments to determine why you cannot reproduce the bug. Start by speaking to the original reporter if possible, and try to see if the steps are correct or any detail of the environment was omitted.

If the bug does not exist, you may decide to not delve deeper down the tree. However, it may still be beneficial to do so, and then move on to step 10 to implement defenses if the bug turns out to be fixed by another change.
Reproduce the bug more than once. If you are dealing with a sporadic bug, you may be misled when you don’t see the bug, thinking it is fixed when it is in fact just not manifesting this round. Replicating multiple times may reveal that the bug is sporadic. You need to use judgement when deciding whether (and how many times) to reproduce. Keep in mind that if you are dealing with a sporadic bug and you are misled, you will need backtrack once you discover your mistake, since you cannot trust the outcome of your experiments.
Step 4: List possible direct causes
List multiple possibilities. You may form a suspicion of what causes a bug and may be tempted to try to fix it at once.
Don’t give in to this urge. Instead come up with at least a few possible causes first:
- It lets you overcome certain biases that can make you overlook the most probable causes. Interesting causes and causes you recently met, for example, are often easier to think of.
- It allows you to optimize the order you do experiments in.
- It prevents you from becoming invested in proving your suspicion, which could set you up for subconsciously ignoring information or spending too much time on uninformative tests.
- It allows you to perform certain experiments at the same time. This can be helpful, for example, when you have long build times.
When you cannot list causes. At times, you may not be able to think of any possible causes, perhaps after you ruled out all causes on the original list.
This happens when you lack information, or knowledge, or creativity.
- Try to reproduce the bug using different test cases; this may suggest more hypotheses.
- Use checklists for common defects.
- Search for symptoms online.
- Question other developers.
- Come up with extreme and absurd causes to spark your creativity.
- Research the system that you are dealing with.
- Do experiments that reveal how the system works.
- Check your work. If there are really no causes left, it may show that you made a mistake. Go back over the tree of causes. Did you miss any? Rerun experiments and verify the results.
- Check your modifications. If you changed the game to find the bug, could your changes have mistakes that lead to faulty results?
- Check your diagnostic tools. If you use custom tools to get diagnostic information, make sure the tools work as you expect. I once was misled because our logger’s reflection did not work for static methods.
Some of these strategies take time, and occasionally you may consider the bug “too expensive to diagnose”. In this case, you may implement a workaround to address a surface cause or even the symptom directly, and proceed to Step 9.
Direct versus deeper causes. When listing possible causes for a bug, you need to list direct causes. Although we want to expose the root cause, if you start guessing at root causes you will have too many possibilities to test.
For example, not initializing a variable is a common root cause, but it could be the cause of any bug.
Start with direct causes — in Step 8 you go to the next level in the tree of possibilities.
(Shortcuts are possible, but are risky and unnecessary.)
Step 5: Design experiments to confirm or rule out causes
An experiment is some action that gives you information about the source of the bug. Examples of typical experiments are:
- Inspecting code or configuration.
- Asserting preconditions, post conditions, and invariants.
- Logging or inspecting a variable.
- Checking if code is reached with breakpoints or logging.
- Running the game with code commented out, altered, or added.
- Running the game with a different configuration.
Good experiments are tests that confirm or rule possible causes quickly.
- How do we rule out division by zero? We clamp the divisor away from zero and see if the bug is still there.
- How do we rule out bad data? We replace it with known good data.
- How confirm that a piece of code is being reached? We put a breakpoint and see if it is hit.
- How do we check whether a calculation is wrong? We replace it with a hand-calculated result.
- How do we rule out that we forgot to hook up a handler? We check in the code.
Experiments should be:
- Quick to perform. Ideally, they should not depend on slow processes such as accessing data on the cloud, or activate after playing for a long time. You may even move code to a different project if it can allow you to do the experiment faster.
- Deterministic. Ideally, you want the same experiment to give the same result every time. To do this, you may need to replace random and player-determined data with fixed data.
If you misinterpret the results of an experiment, you will go down the wrong branch of possible causes and waste a lot of time.
- Remember that exceptions disrupt the normal flow of a program, and make sure your experiments are designed so that errors are revealed and not hidden.
In this example, we will not know if Move is reached when an exception is thrown before the log statement.
public void Move(Vector3 deltaPosition)

{

   player.transform.position += deltaPosition;

   Debug.Log("Move reached");

}
In this example, we will not know if an exception is thrown.
public void Move(Vector3 deltaPosition)

{

   Debug.Log("Move reached");

   player.transform.position += deltaPosition;

}
In this example, we will know if the method is reached, and also finishes.
public void Move(Vector3 deltaPosition)

{

   Debug.Log("Move reached");

   player.transform.position += deltaPosition;

   Debug.Log("Move end reached");

}
- Make sure that your logging or assertion mechanisms are active. I usually print a message with all mechanisms at the start of the game that they are working (and not stripped from the build because of compiler directives, for example.)
Debug.Log("The log is working");

Debug.Assert(false, "Asserts are working");
- Avoid complex code in experiments. Complex code is more likely to have bugs that make the results of your experiments misleading and throw you off the trail. For example, preventing log messages in an update method to be printed every frame can involve tricky code that is difficult to get right. It is better to find a simple solution that you can trust.
Step 6: Order experiments to reduce the expected time to diagnose a bug
Don’t do experiments in the order that they occur to you. Instead, assign rough time estimates to experiments, and likelihoods to the causes they rule out. Then put experiments first that are quicker to do and rule out likelier causes.
Don’t include the time of interventions in your estimations for ordering experiments. In the end, you will implement only one intervention, and no matter what order you follow, the time it will take will be the same. Therefore, it should also not affect the order.
Run tests in parallel when it makes sense to do so. For example, a group of your experiments may involve seeing if certain break points are hit when following the reproduction steps. It is efficient to add all the break points and perform the reproduction steps once and see which are being hit.
Step 7: Do the experiments
This step is straightforward: do the experiments in the order you decided in the previous step, and stop once you have the culprit cause.
If you make changes to the source code, use source control to help keep track of your experiments. Make it possible to recover experiments made in code so that you can check your work later if required. Document what you are doing, and note the results of your experiments.
While doing experiments, reproduce the bug exactly in the same way each time. This ensures that you are not mislead when there are multiple causes for a bug. (If there are multiple causes for the bug, that will be uncovered during more testing, perhaps as you verify at the end of Steps 9–12.)
Step 8: Drill down to the root cause
If we are at the root cause, we can continue to the next step.
Otherwise, the cause we uncovered in the previous step is treated as the new bug. We reformulate the bug in the When X I expect Y but Z-form, and continue to Step 1. Reproducing the new bug is a sanity check to make sure you are on track.
How do we know we are at the root cause? If we ask “why”, and the answer is an external cause — that is a cause outside the code:
- Because of sloppiness.
- Because of a misconception.
- Because of a bug in external hardware or software.
Step 9: Implement an intervention and verify
Once you are sure what causes the bug, you can fix it.
⚠️ Always verify that your intervention fixed the bug.
⚠️ When verifying, also test other cases, not just the reproduction case.
⚠️ Make sure you understand why the intervention works and that it makes sense, otherwise you may implement a fake fix that works only partially or introduce more bugs.
Usually, you should implement an intervention at the root cause.
- It will fix other symptoms of the same underlying bug.
- It reduces the chances of your fix making things worse by introducing other bugs. For example, if a bug is caused by a variable not being initialized, a surface fix may skip over the code if this is the case. But then the skipped code may never be executed, leading to other bugs.
Consider the example bug we examined before, with this causal chain:
🐛 When the level loads, I expect to see my avatar, but instead I don’t.
- Because the code that moves the player calculates the new position as zero and we cannot see the origin.
- Because the inventory is null and the player update method prematurely exists.
- Because it has not been initialized.
- Because I forgot.
This bug can be “fixed” in any position in the chain (except the last, of course).
- We can recalculate the position if it is zero.
- We can change the update method to only skip over the relevant part where we work with the inventory.
- We can initialize the inventory when the player is initialized.
The fixes will all “work”, but they are not equal.
At times, fixing the root cause may be too expensive (for example, if you have to redesign the architecture of your game to ensure a predictable initialization order). When this is the case, you can implement a workaround at a surface cause.
⚠️ Commit any changes you made during this step.
Step 10: Implement defenses and verify
Once a bug is fixed, see if you can make the code more robust and have it reveal problems related to the bug you solved. For example, if a problem was caused by a null reference of a field, see if you can put in a check to warn if the field is null.
⚠️ Always verify that the defenses you add work as expected.
As an example, suppose you had this scenario:
public void InitGame()

{

   //InitPlayer();

   InitInventory();

}

public void InitPlayer() => player = new Player();

public void InitInventory()

{

   if (player != null)

   {

      inventory = new Inventory(player);

   }

}

public void ShowInventory() => inventory.Show();
When calling ShowInventory, a null pointer exception will be thrown. Uncommenting InitPlayer fixes it (and perhaps somebody did it to fix another bug). Although that works, it would be good to put in a check in the InitInventory method to flag a null player instead of simply ignoring it.
public void InitGame()

{

   InitPlayer();

   InitInventory();

}

public void InitPlayer() => player = new Player();

public void InitInventory()

{

   if (player == null)

   {

      Error.Throw("Player null when creating the inventory.”);

   }

   inventory = new Inventory(player);

}

public void ShowInventory() => inventory.Show();
If you implement a surface intervention:
- Add a comment to explain the bug and the fix.
- Try to defend against the situation that the root cause is fixed in the future. Ideally, you can detect when this happens it and remove the surface fix.
For example, suppose that you want the player to only jump when it is in the OnFloor state, but because of a bug that you cannot fix the state is always BelowGround. You decide to implement a surface intervention as shown below:
public void Jump()

{

   /*  Logically, this should be PlayerState, but because of a

       bug in the animation logic the state is always

       PlayerState.BelowGround at this point.

   */

   if(state == PlayerState.BelowGround)

   {

       PlayJumpAnimation();

   }

   else if(state == PlayerState.BelowGround)

   {

       Error.Warn("This state is logically correct but never

          occurred because of a bug. Perhaps the bug has been

          fixed. Check the code.");

   }

}
Sometimes a fix involves a change that is not obviously correct. This may tempt a programmer to change (or remove) it in the future. If the code is not obvious, add comments to clarify, especially if the symptom is far removed from the bug.
public void Die()

{

   //May happen in rare cases when fighting multiple enemies

   if(dead) return; //Otherwise the death animation plays again

   ...

}
⚠️ Commit any changes you made during this step.
Step 11: Think and work through consequences
In complex projects, it is not uncommon for a fix to break something in an unrelated system. Unit tests and regression tests will help, but even so you should consider how your changes could affect the rest of the game.
The following thought experiment will help:
⚠️ Assume there is a bug. Now where is it? How can you find it?
You can start with inspecting references to variables or methods affected by your change. In particular, look out for code that executed that did not before or vice versa .
If you changed how a variable or property is calculated, find all references to it and see whether the changes you made would affect any of the code.
⚠️ It is very common to introduce a bug when changing the nullness of a variable, so be especially wary in this case.
If you changed what a method does, find all references to it and see if the change could affect the code.
⚠️ It is very common to introduce a bug when changing the nullness of a method’s return value, so be especially wary of this case.
Example. The player was not moving, and it turns out it was because the player variable was never initialized, so the player’s update was always skipped. Here is the code:
void Start() {}

void Update()

{

   if(player == null) return;

   player.Update();

   boss.Update();

}
The fix is to assign the player variable (and remove the null check that is not necessary anymore).
void Start()

{

   player = new Player();

}

void Update()

{

   player.Update();

   boss.Update();

}
But that is not a complete fix, as the boss variable is also not initialized, and our fix will make the game crash when we run it.
void Start()

{

   player = new Player();

   boss = new Boss();

}

void Update()

{

   player.Update();

   boss.Update();

}
⚠️ Commit any changes you made during this step.
Step 12: Clean up and verify
The last step is to undo any changes you made during the diagnosis proses, and to verify that the bug stays fixed afterward.
Some of your diagnostics may be useful to keep for the future:
- Leave assertions (if they hold in general circumstances and not just those the bug was diagnosed in).
- Move temporary code that visualizes data to a library where you can re-use it if the occasion arises.
- Logging statements are only useful when they are consistently applied to a part of your game, and generally should be removed. Occasionally, they are generic enough to be useful (for example, logging all server calls and responses).
⚠️ Commit any changes you made during this step.
Good practices
Don’t tolerate bugs during development
Building zero-defect software is very expensive, and a counter-productive strategy for games.
But bugs are not only bad for the players if they land in the end-product; bugs — even small bugs — that live in the code-base during development are problematic.
Keep the following in mind in deciding where to strike the balance between “too expensive to fix” and “too expensive to keep around”.
Bugs annoy and slow down developers and testers. A system that does not work as intended (up to that point) prevents everyone on the team to do their work effectively.
Bug diagnosis cannot reliably be scheduled. The process of finding a bug is a search through possibilities that stops once the cause is found; the time this takes is unknown. The more bugs in your game, the less sure you can be of the shipment date.
Bugs can hide the existence of other bugs. For example, if a bug prevents a block of code from executing, you don’t know if another bug hides in that block.
Trivial bugs that spam the error console or log hide more serious bugs. Often serious error conditions are missed because there are too many trivial errors or warnings that are ignored.
A bug signals a problem that can cause other bugs in the future, or that causes other bugs not yet seen. A problem that appears small now can grow as the root cause manifests itself in other ways. It can also manifest itself through code that other developers write, and will waste their time as they try to track down the problem.
The older a bug is, the harder it is to diagnose and remove. A bug introduced today is easy to fix — you still remember how the code works, the amount of code where it can hide is small, and fresher bugs don’t obscure the results of experiments.
Bugs have a negative psychological impact on the team. Programmers will be less careful to introduce new bugs in an already buggy system, or will dread having to make changes in problematic areas. A buggy system is not good for morale.
Recognize bug patterns and use generic strategies to deal with them
A few types of bugs crop up regularly, and these bug patterns have similar debugging strategies. Here are examples. For example,
🐛 When X, I expect Y but instead nothing happens.
Here is an instance of this pattern:
🐛 When I press the “Play” button, I expect the game level to load but instead nothing happens.
We can use generic strategies to diagnose these bugs. Here are a few patterns and their strategies.
🐛 When X, I expect Y but instead nothing happens.
Find the place in the code where Y is implemented. Between X and Y, you will find code that is (abstractly) of the form if (X and C1 and C2 and…) Y. Do experiments to find out which of the conditions (X, C1, C2) are failing.
🐛 When X, I expect Y, but instead Z happens that prevents Y.
Between X and Y, you will have a sequence of statements (abstractly) S1, S2, … The strategy is to find the first S where Z happens.
🐛 When X, I expect an object to still be in state A, but instead it changes to B.
Find instances where the state is changed. If there are only a few instances of this, do experiments to find out which one is the culprit, and drill down from there. If there are many instances, wrap the state in a variable that reports when it changes to the unwanted state. Use this to find the faulty caller, and drill down from there.
🐛 When X, I expect an object to change from state A to B, but instead it changes to state C instead.
There are two possibilities: the state is miscalculated, or it is calculated correctly but the change is applied the wrong number of times. Do an experiment to distinguish between these cases.
🐛 When X, I expect to see A, but I don’t.
When you cannot see something, there are only a few possible causes:
- It is not there.
- It is there but in the wrong place.
- It is in the right place, but it is:
- inactive
- transparent, clipped, or culled.
- too big (you are inside the object) or too small.
- (in the case of planes), facing the wrong way
Run the game and look for the object using your editor tools. If you don’t find it, and it was there from the beginning, you have a case 3 pattern; if it was not there from the beginning, you have a case 1 pattern. If you do find it, a few quick experiments through inspection will tell you which of the possibilities apply. Again, if the state was like that from the beginning you have a case 1 pattern, otherwise a case 3 pattern.
I listed common patterns above, but you will spot other patterns in your code base. When you do, develop and document a strategy to debug these very quickly.
When tracking a pattern bug, and your strategy fails to diagnose the bug, use the 12-step process the find the bug, and update the strategy to account for the new possible cause. Patterns with strategies that become too complicated as they are updated after several failures seize to be useful and need to be pruned from your collection.
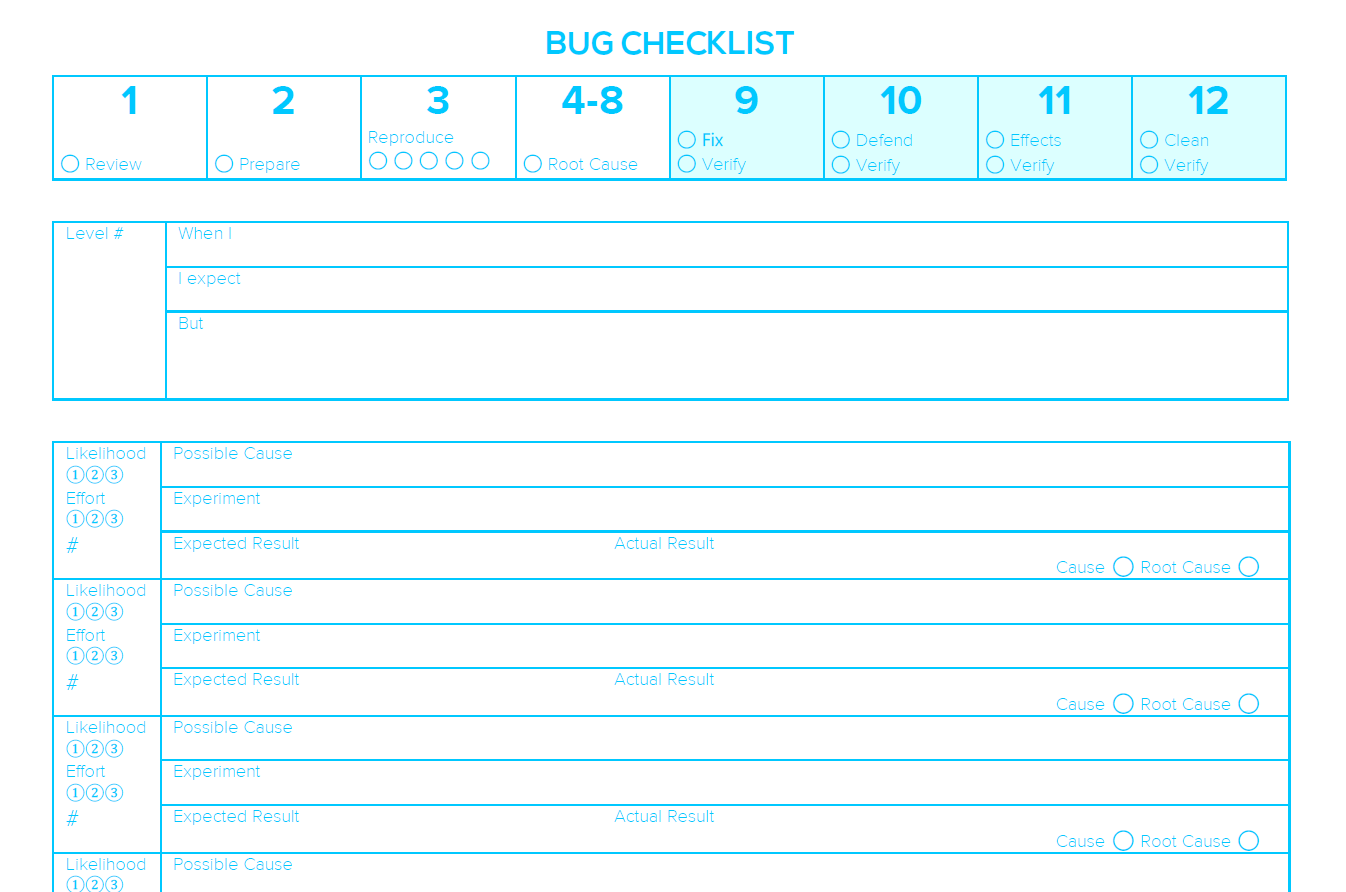
Use checklists and document your progress
It is important to keep track of where you are in the debugging process. Use a checklist to keep track of the steps (remembering that Steps 4–8 get repeated).
Also keep track of the tree of causes, and especially note the experiments and outcomes.
Your progress documentation:
- prevents you from getting confused about where you are in the process,
- can be used to ask questions to other developers on your team and on answer sites,
- can be used to check your work in case you made a mistake and got stuck,
- will form the basis of a bug diary if you keep one (described below), and
- will be useful if you do a debugging postmortem.
I designed the following checklist that works with the process described here. You can print out copies and use them to make systematic notes about your debugging progress.
Download Debug Checklist (PDF)
Don’t get distracted by deep causes
Sometimes you will be able to make a guess about the cause of a bug, and you may want to investigate that instead of following the systematic approach. This often happens as you work down the tree.
There are good reasons to be wary of guessing like this:
You may be wrong. If you are wrong, you are wasting time pursuing them.
You may mistake a deep cause for a root cause.For example, if you suspect a certain crash happens after dismissing a dialog because the game does not get unpaused, you may “fix” it by Unpausing the game when the dialog button is being pressed. However, it may turn out that additional cleanup is necessary, and the method that does that in addition to the unpausing the game is not subscribed to the dialog’s dismissal. So, the fix is only partial.
You may implement a fake fix. It can happen that the bug looks like it is fixed, but instead there are now two bugs — the original, and a new one that obscures the old one. This can happen because you don’t understand the chain of cause and effect. In the previous example, the real fix may be to simply call unpause on the player.
Calling unpause on the entire game also does that, but it also calls unpause on other objects — left active for ambient animation in the background — that (wrongly) resets certain values and lead to other bugs. Later, when discovering this, the fix may be to not call unpause on the game, leading the original bug to re-occur.
As you get more experienced, these guesses will tend to become more accurate, and you may decide to ignore this advice. If your guess looks correct:
- Follow the scientific method from Step 8 to ensure this is indeed a root cause.
- Pay special attention to Step 11 to make sure you do not have a fake fix.
Work effectively with your QA team
Working closely with the QA team is crucial for delivering a high-quality game. Here are some guidelines to save time and ultimately deliver a better product.
Use shared standards for bug reporting and tests. This makes it easier to ensure the bug has the right information no matter where it comes from, and to follow the same processes as you start the debugging process. Using the same standard tests helps to communicate bugs and reproduction steps precisely.
Use common vocabulary when talking about the game and bug conditions. To prevent confusion, it is important to use the same terms when describing elements of the game, such as enemies, items, places, gameplay units, game modes, player actions, etc., especially since terms may not be spelled out in the game. For example, does “the second level” mean the second mission or the second campaign (a collection of missions)?
Although it is not possible to establish the entire game’s terminology upfront, you can make a start by exporting lists of gameplay elements from the game, and then add any missing terms to this terminology sheet as team members discover them. Make sure everyone is aware of this sheet and uses the vocabulary in it.
Use common vocabulary for error conditions. For game error conditions, use standard terms when they exist, such as “z-fighting”, “ghosting”, and “foot sliding”. If your game has common but non-standard problems, give those error conditions names, and use them consistently.
Do your own verification in steps 9 – 12. In projects with a QA team, programmers may sometimes feel tempted to skip some of the verification steps, assuming that their fixes are likely correct, and that any mistakes will be caught by the QA team. Too often, fixes end up being incomplete or wrong, or causes even more problems.
When this happens:
- It wastes time. Not only do you introduce another iteration, but if enough time goes by, but you will also forget the context of the bug, which will make it more difficult to fix
- It erodes the trust your team has in you. If fixes don’t work or present new problems, the tester may become frustrated, and your team and superiors may think less of your abilities.
Provide tools to make testing more efficient. The tools mentioned in Step 2 to speed up debugging can speed up testing. These include modifications to the game for easier reproduction of bugs (such as level skip, invulnerability, or deterministic enemy generation) and access to in-game diagnostic tools like loggers, performance monitors, and visual aids. Specialized tools for taking screenshots that allow you to match them with the log (in time) and your game world (in space) can be an incredible time saver.
⚠️ Use best practices to ensure that these tools or modifications do not end up in production builds.
⚠️ Talk to testers about their needs, which may be different from those of developers.
Help testers understand the potential scope of your fix. In a complex project, the root cause may be distant from the symptom, so that the area where the fix is made is not immediately obvious for somebody that does not know the code. In one project I worked on, if you unplugged the network cable, the game would crash because of a null pointer exception in a dialog box. It would be impossible for a tester to know the UI was changed unless I told them. It is useful to add information about your fix to the ticket, and explain what parts of the game could vulnerable because of it so they can test it thoroughly.
Investigate the reasons for non-bugs and recurring bugs
Sometimes expected behavior is reported as bugs. When this happens, it is worth speaking to the reporter, if possible, about why this happened. It is also worth alerting the rest of the team of a possible issue that can be addressed with better communication or game design.
Many bugs recur. When you see a bug for the second or third time, investigate why it recurs. Possible causes include:
The fix was undone. This often happens when the fix causes another bug. If you don’t notice this, and reapply the fix, the programmer who undid your fix will have their bug recur, and undo your fix again! When two (or more) bugs live together in this unhealthy relationship, they need to be solved together.
It is another occurrence of the same cause. For example, the original bug was caused by a missing reference on an enemy prefab, and the new bug is caused by the same missing reference on a different enemy. In this case, the defense you implemented the first time was not robust, so make it more robust. Then go through the enemies systematically (or use a tool to do so) and look for other missing references of the same field.
There was a missing case. Certain behaviors have complex logic. For example, if you fade to black and back between scene changes, when dialogs are displayed, or a user walks into solid objects in a VR game, there are lots of cases to handle (consider, for example, what should happen when the user is already walking into an object when the scene transitions).
These types of bugs often occur when not working to a detailed specification. Logic is added bit-by-bit, and because the problem is not evaluated systematically, the logic becomes more complex than it needs to be. It would pay to write the detailed specification, and re-implement the code to follow it.
Changes made to duplicated code was not made everywhere. For example, if logic for checking that a text field only allows from a specific set of characters is replicated for each UI element, problems solved on one place will not solve problems in another. In this case, a refactoring is usually required to address the bug properly.
How to become a better debugger
Practice
There is no shortage of bugs to fix, and over the span of a career you will get plenty of opportunities to practice.
If you are a new programmer with some time to spend on technical self-improvement, it may be worth doing a few weeks of intense debugging to experiment with processes and techniques. Delve into a code base, or answer questions on Game Development StackExchange.
Another way to practice is through an exercise we used at Gamelogic at the time:
- Ask another programmer for a juicy bug they have recently fixed.
- List possible causes and arrange them in the optimal order.
- Now ask the other programmer to tell you what the result of each experiment would be, until you isolated a cause.
- Drill down to the root. Can you diagnose the bug? How long does it take you?
Do bug-finding post-mortems
The purpose of a bug-finding post-mortem is to find ways to improve bug diagnosis, and it is done for bugs that took an unexpectedly long time to diagnose. The purpose is to uncover issues that you can address to prevent these problems from tripping you up in the future.
During a debugging post-mortem, ask questions like these:
- Did communication about the bug cause delays?
- Did you miss causes as you worked your way down the tree of possibilities?
- What misconceptions caused unnecessary delays in tracking down the cause?
- Did your tools let you down?
- Did you introduce bugs during the process that misled you?
- Were the time estimates for experiments correct?
- What experiments could be improved or replaced with better ones?
Keep a bug history
Keep track of the bugs you encounter, how they were diagnosed, how long it took, and what intervention was implemented.
This is occasionally useful as a reference when dealing with a bug you have dealt with before, making it much faster to diagnose and fix.
⚠️ You can use bug tracking software to keep your history, but you need to add how you diagnosed the bug and what intervention you implemented to the ticket after you solved it.
A bug history allows you to spot common mistakes. Mistakes like these can always be prevented in principle (through coding practices, processes, tools, and libraries). For example, if you tend to swop geocoordinates by accident, you can use one of these ways to prevent it:
- Coding practice: Better naming conventions that make these mistakes more obvious.
- Process: Tests that are designed to flush out these types of mistakes, for example, using recognizable locations.
- Tools: Tools for visualizing locations on a map that makes it easier to spot discrepancies.
- Library: A data structure that handles all common operations so that we don’t need to use components individually, perhaps supported by UI components. The idea is to solve the problem once and stash it in a library for repeated use.
Over time, your bug history will allow you to improve estimates for the probabilities of certain bug causes, and the times to perform more complex experiments.
Finally, your bug history can also help you spot deeper weaknesses. Looking at the root causes and human causes of bugs points to where we can improve architecture, our programming practices, and our understanding of the system we are trying to model.
For example, in one team we had a swarm of bugs caused by programmers not understanding how other programmers hooked up and implemented their complex GUI components. Eventually, we adopted a canonical design that all GUI components must follow. Since then, bugs caused by misunderstanding the setup or implementation of a GUI component has been rare.
Learn how things work
Misconceptions are one of the three external causes of bugs, so knowledge that removes misconceptions reduces the number of bugs you will create in the future.
Learning the math of physics, or the details of the Facebook API, or the darker corners of C#, will not only decrease the number of bugs you introduce in the future, it will also lead to more innovative games, faster development, better testing procedures, and better debugging experiments.
Use your bug diary to find the weak spots in your knowledge.
Learn to use debugging tools effectively
Debugging tools are used to run experiments effectively. The most important tool to master is your IDE’s debugger. How to use debuggers is a rich topic, and falls outside the scope of this article. Here are resources to get you started for two common IDEs:
Learn specialized tools and techniques
Find out what specialized tools and techniques programmers use to debug in the areas of game development you work in, and learn to use them. This will save you a ton of time.
Here are some examples of what I mean:
- Debugging graphics with Visual Studio
- USB Debugging on Android
- Debugging Deep Neural Networks
- Debugging multiplayer games
- Random number visualization
- Algorithm visualization
Conclusion
Bugs disrupt the development process, and therefore dealing with bugs effectively is important to streamline development. And because computers are deterministic devices, we can use a scientific process to diagnose bugs in the most efficient way possible. By looking at our process over time, we can improve our process to create fewer bugs and find them faster. We do not have to be slaves to our bugs.
Acknowledgments
This article was originally inspired in 2017 by a bug that plagued my team at the time for a month, and the original ideas were sharpened by the many discussions I had with programmers Esteban Gaetes and Omar Rojo (the phrase “Computers don’t use magic” is his).
The 2023 update came about after a deep dive I undertook with Ross Adams into the causes of bugs and the processes the programmers use at 24-Bit Games.
We asked programmers about their debugging processes (among other things), and from these discussions, I added additional refinements from veterans Matt Benic (on setting up your debug environment), Diorgo Jonkers (on replicating more than once), and Johan van Staden (about anticipating how changes can break code elsewhere). Johan’s enthusiastic advocacy for checklists also inspired the checklist I made for this process.
We asked everyone (including testers and producers) about bugs and how it affects development; this shaped the emphasis a lot on the ideas discussed here.
After talking to the head of QA, Brandon Wolff, I made some tweaks to the bug reporting section.
Side-by-side debugging sessions with Peter Msimanga were especially helpful to discover some of the dangers one can encounter and to test the checklist in physical form.
Omar Rojo gave me additional ideas after reading the new draft that I incorporated. For example, he suggested to include debugging aids in reports and to ensure experiments don’t rely on slow processes.
The bug report format is from Joel Spolsky.
Some of the ideas in this article is my take on those in Effective Debugging: 66 Specific Ways to Debug Software and Systems by Diomidis Spinellis and Chapter 23 Debugging in Code Complete by Steve McConnell.